How to Create Comparison Table using CSS & Tablesspress Plugin
Comparison tables are the best way to convert users while creating Amazon affiliate sites. We all know how much conversion matters when you have fewer visitors on your website. But don’t worry you can still increase the revenue by increasing the conversion rate by using the Comparison table created using Tablepress and customized CSS. We are going to show you how to create quickly and easily using a free plugin in WordPress.
There are so many ways to create Amazon Affiliate Comparison Table but which one is going to increase the dwell time on your page and conversions. Nowadays I am seeing all of Amazon Affiliate Niche Sites using them. These days there are a lot of plugin options available such GetAAWP, NinjaTables or Azon Tables. But what if you are a newbie and don’t have money to buy these plugins. That why we have prepared this guide for all of you.
They are most commonly used in e-commerce and by latest in Affiliate Product Review Websites. In this article, We are going to show you 2 ways to create Pricing Tables
- One by using Tablespress Plugin & Amazon Associate Link Builder Plugin
- Again Using Tablepress Plugin with Customize CSS and HTML
You must follow one thing while creating these tables is that they must be responsive otherwise the conversion rate will not be as good as it can. They have one disadvantage as not perfectly show on small screens but can be made responsive. To learn that, keep reading below.
Comparison tables must include all the key details of what a user looks in for a product. It makes the click on the price link quickly and Lands on Amazon site so that your conversion rate increases.
Before you decide to create the table, make sure to choose the best products only. You also have to decide how many products you are going to mention in the table, Most of the time, as I have seen on many websites like Sawadvisor, or 10beasts, former has mentioned 5 products and later has mentioned 10 products respectively.
The selection of no of products mostly depends on what kind of competition you have in google search. If you are a newbie you may have a hard time while selecting the products or which things to include in the table. In this article, we will try to answer all the questions you have about creating a Comparison table with CSS and Tablepress plugin.
1. Creating Tables with Tablepress and Amazon Associate Link Builder Plugin.
Before you even start creating a new table, know which thing to include in a table.
When someone shops online not many users have any idea about what to look in a product without having to study product page completely. They don’t which features to look for in a product. If you are the owner of an Affiliate Niche Site and write product reviews, compare the products you didn’t even test, comparison table are a great way to summarise a product.
If you show all the important information in a table in front of a customer and help them make a quick decision then your chances of converting a customer increases. Therefore more product details, more chances of converting a customer and more money you will earn.
Don’t add the too little information which doesn’t give the clarity to a customer and not help them make a buying decision. This will hurt your website for sure. Or
Also, don’t add too much trivial information as well. Which will make the customer think for so long and in the end He/she will leave without even clicking on the product.
Here the 3 must have things to add in Table:
- Image of the product - must show how a product looks like
- Name- Share the Name of the product with its code
- Price- you can either add Check price and link to amazon affiliate Link Or Use Amazon API to show the price.
Before we start, You need to download, install and activate below plugins.
1. The TablePress plug-in: https://tablepress.org
2. The official Amazon WordPress plug-in, Amazon Associates Link Builder
Here‘s the picture of final table…

Creating A Table With TablePress
- After installing the plugin, create a new table
- Select 5 row and 5 columns for Table, you can later add or delete them.
- Name your Table so that you can search it later.

Now you need to name each column like Model, Price, Weight, etc.You can see in the below image.
Now to add Images, we took the product image uploaded on WordPress media library of our site and took its URL. To add the image use below code. You can even use the product name in conjunction as we used
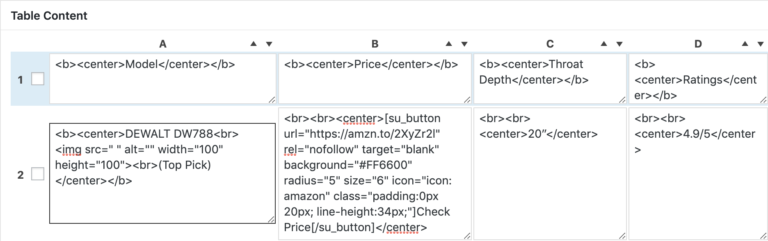
<b><center>Name of Your Product<br>
<img src="URL-YOUR-IMAGE" alt="Name of Your Image" width="100" height="100"><br></center></b>
Adding Price or Check Price Button
Now there are 2 options either you add check price button as we added in the above table in Image 1 or you can use Live Price to show to the customer which is available on Amazon using Amazon API Plugin.
To create a Check Price button
1. Install Shortcode ultimate plugin and activate it. Use our below code to add button in the table. For that, you also need to use Amazon Affiliate Link either short URL or a long one.
Like this
[su_button url="Amazon Affiliate LINk" rel="nofollow" target="blank" background="#FF6600" radius="5" size="6" icon="icon: amazon" class="padding:0px 20px; line-height:34px;"]Check Price[/su_button]To Show the Live Price Link

With Amazon Associates Link Builder plugin we can add live price and that doesn’t violate Amazon Affiliate Policies.
Once you have installed and activated the plugin, Go to new post WordPress editor. There you will see Amazon search box over it. Here you can directly search the product using their ASIN number. Once you select the product and show code.


A Shortcode is then added to your blank WordPress editor. Select and copy this Shortcode…
& then insert it into the cell of the table where you want the current price to show.
Now Add the other details as we have shown in Image 1. Just save the table, copy the table shortcode and add it to your article.
2. Creating Table with Tablepress and Customize CSS

To make a table like that you just need to customize CSS. Add the below CSS in your customize CSS box. This is the responsive CSS for the table.
tablepress tfoot th, .tablepress thead th{
	background-color:#0d3742;
}
.main-thead
{
background-color:#0d3742!important;
color:#FFFFFF!important;
font-weight:700;
text-transform:uppercase!important;
padding:7px 7px!important;
}
.row-1_th{
background-color:#0d3742!important;
}
.main-thead th{
	text-align:center;
	letter-spacing:2px;
}
.column-4{
	align-items:center;
}
.column-2{
    font-size:20px;
    text-decoration:underline;
    width:22%;
    border-right-width:0px;
}
.column-3{
    padding-left:20px!important;
    border-right-width:0px;
}
.column-1{
    border-right-width:0px;
}
@media screen and (max-width:860px) {.th-name
{
	display:none;
	}
}
@media screen and (max-width:860px) {.th-buy
{
	display:none;
	}
}
@media screen and (max-width:860px) {.th-feature
{
	display:none;
	}
}
@media screen and (max-width:860px)
	{.trt-row
{
display:flex;
flex-wrap:wrap;
background:#fff;
border:1px solid#E6E6E6;
border-top:none;
}
}
@media screen and (max-width:860px) {.column-1
{
width:45%;
order:3;
margin:0;
box-sizing:border-box;
border:none!important;
display:flex;
justify-content:center;
align-items:center;
	}}
@media screen and (max-width:900px) {.column-2
{
order:2;
width:100%;
background:#fff;
box-sizing:border-box;
border:none!important;
display:flex;
flex-direction:column;
padding:10px!important;
margin:auto;
	text-align:center!important;
	font-size:22px!important;
	}}
@media screen and (max-width:900px) {.column-3
{
order:4;
width:55%;
background:#fff;
box-sizing:border-box;
border:none!important;
display:flex;
flex-direction:column;
padding:0 10px 0 8px!important;
margin:auto;
	}}
@media screen and (max-width:900px) {.column-4
{
background:#fff;
padding-top:10px!important;
border:none!important;
order:4;
min-height:60px;
display:block;
justify-content:center;
align-items:center!important;
padding-left:80px!important;
	}}